Thursday, June 30, 2011

My First Giveaway

Those of you who have followed the comments on my last post may have read, that I was thinking about making a giveaway when I reach 50 followers. I'm at 49 today, but tonight I've got enough time, so I thought let's just make it NOW :)

This is a good opportunity to say thanks to you all for visiting and following this blog and leaving those wonderful comments. I love reading them and they really make my day! I’d also like to thank Debi from Crochet, Crafts & Gardening for picking made-in-k-town as featured blog on her last blogday, Kathryn from Crochet Concupiscence who also mentioned my site in her recommendations, and all of you who put my link on your bloglist!


And this is my giveaway for you, made during the week especially for this occasion:


I hope you understand that I picked a very small stone this time – sending a huge and heavy rock to America or Australia would probably be too expensive, and I'd really like to ship this stone to any place the happy winner-to-be lives :)

I think I’ve found the perfect way for a fair decision about the winner of this stone. I’ve got a question, and there’s only one correct answer. Whoever posts the right answer first wins. Easy, isn’t it?

So here’s the question:


If you don’t recognize it at once (I wouldn’t, because I had never seen such thing before), this is my Mom’s digital kitchen scale. What do you think is the weight of this stone?

Here are some rules:

1. To take part in this competition, I ask you to be or become a follower of this blog.
2. Please enter your result in grams (g). If you're more accustomed to ounces, just use this easy ounces-to-grams-calculator
3. Please enter your result (and only one result per participant please) until next friday, July 8th, 5 p.m. (German time). If someone's got the correct answer, the competition is over on friday and we'll have a lucky winner.
4. If the correct answer has not been entered until then, I might give a little hint and you'll get a second chance to post another result until sunday, July 10th, 5 p.m. - and both results (old and new) will count!
5. If nobody has entered the correct result until then, the one who's closest to the real weight of the stone wins.
6. Finally, I'd like to give a little advantage to those who have already followed this blog before this competition: Those 49 followers will get a tolerance of +/- 2 grams. Example: If an "early" follower enters 987g as a result, he's also in with any weight between 985g and 989g.

Remember: the first correct (or almost correct) answer wins, so be quick and enter your guess!

Good luck! :)


Sunday, June 26, 2011

Covered Stones - The Second Collection

Now that the United Colors Baby Blanket is finished, I've already got some ideas for the next big project in mind. I'm still trying a few things with colors and patterns, but as soon as the idea takes shape, I'll share my plans with you :)

Meanwhile I'd like to show you my second collection of covered stones (for pictures of the first collection look here and there).

Let's start with a small and cute one:


It's the smallest and most simple one I've made so far, I just crocheted a net with dcs and chs and added a fabric butterfly from a table decoration set :)


For the next one, I started with a Japanese Flower (as seen on Lucy's attic24) and, again, finished the stone with a simple net-pattern. And of course I had to add a button :)


Take a look at the next one, do you recognize the pattern?


It's the quite popular Starburst Hotpad pattern. I've seen a wonderful version of the Hotpad on Marions bunte Handarbeitswelt and followed her link to the original pattern. A flower is a flower is a flower - and why not use it on a stone?


I think most of you know Edie Eckman's fabulous book Beyond the Square, don't you? It's a great source of inspiration for motifs and I used it for the next stone:

This is motif #17 from the book. It's quite an elaborate pattern with many ends to weave in, but I think it was worth it. I've made the motif with white and then continued with a light green and made up a pattern as I went on.


The only thing that bothered me a little about that stone, was that there's no real contrast between the stone and the yarn. Most of the stones I've got are light grey or light brown, so for the next one I've decided to work with black yarn:


The motif in the middle is a very easy flower (visit The Yvestown Blog). 


For today's last stone I've changed the strategy: Usually I start with a motif in the middle and the rest is just a simple pattern to close the stone. For the next one, I've focused on the pattern itself, so there's no flower, button or other eyecatcher in the middle:


I've got the pattern from a german crochet magazine. Those magazines are usually full of doilies - I've never made a doily in my life, but it seemed the perfect pattern for what I had in mind :)


That's all for today. I've made two other stones, but the style is completely different from the ones I've showed you today, so they'll be part of another post soon. I hope you like today's pictures and maybe this post (with the links and ideas) is helpful to you, if you'd like to crochet around a stone and don't really know how or where to start :)

Have a nice sunday everyone!

Thursday, June 23, 2011

Mission Baby Blanket: Accomplished!

Today I can finally present you my finished Baby Blanket. Hooray!!


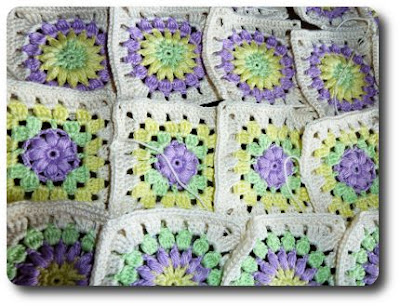
Although I only used three different colors plus beige, I've decided to call it "United Colors Baby Blanket". The baby for whom I've made this blankie will be born in New York to a German Mom and a Chinese Daddy - if that's not a case of united colors... :)


I like reading statistics to finished blankets, so here's mine:

Size: 75 x 75 cm

Yarn: Catania by Schachenmayer, colors Pistazie (2x), Mimose (2x), Flieder (2x), Crème (6x)

Pattern: 
36 Squares “Sunburst” (German Video-Tutorial on nadelspiel.com)
28 Squares “Babyblümchen” (German Video-Tutorial on nadelspiel.com)

Edging: Bobble-Shell-Edging (Pattern by Lucy on attic24)

Timeline: 11.05.2011 – 23.06.2011
(with 2 breaks á 2 weeks when I had to wait for yarn)

Evaluation:
Positive: I love the colors and the pattern, it was easy and quick to make.
Negative: The blanket is not soft and cuddly enough for a baby blanket, but a little bit too heavy and stiff. Next time I’ll have to use a different yarn.


Overall I'm quite happy with the finished result - what do you think?


Edit:

Thank you so much for the lovely words in your comments! Some of you have asked me different questions, and I'll try to answer them here:

About the yarn (Catania): You can wash it in the machine (40 °C) and iron it with steam, but you shouldn't put it in the dryer.

Joining the squares: I crocheted the squares (right sides facing) together with slip stitches, using the inner loops only. I hoped the outer loops would fold around the seam, so that the blanket looks nice and smooth. It didn't work as well as I had planned, but I think a little bit more ironing might help.

About the Video-Tutorials: Actually I don't like Video-Tutorials, because my internet connection is not the fastest. Nadelspiel is an Austrian website made by lovely eliZZZa, and it's all about crochet, knitting and sewing. When I re-discovered crochet a few months ago, this was the first website I found and I loved it because of the wonderful granny squares. I linked to the Video-Tutorials, because that's where I've got the patterns from - but actually I really do prefer written patterns or drawings.

If you've got more questions, please let me know and I'll answer them here!

Now I'd like to ask you a question: is it just my perception, or do you also think that blankets are the most popular crochet items ever? Of all my posts, the ones concerning the baby blanket have the most visitors. And me, when I visit a link gallery (like i-crochet), I always click on pictures with blankets first. I also think that on other blogs these posts have the most comments. So, what do you think? Is a blanket really the no.1 crochet project? Why?? And if not: what is more popular than blankets? I'd love to read your opinions! :)

Monday, June 20, 2011

Displacement Activities

Hi there!

Actually I was really looking forward to showing you the finished baby blanket, but unfortunately you'll have to wait a little longer. I've finished all the squares before the week-end, but I neither like weaving in all those ends, nor joining the squares. So, as a little distraction, I came up with this:

I've been using these empty liqueur bottles as vases for a while now and thought they'd look nice with a little cover. And of course I was eager to use one of my chinese buttons :)

From tomorrow on I'll be working overtime for a while now, so I probably won't have that much time for crocheting and blogging anymore. Nevertheless, I hope I can show you the finished baby-blanket before the next week-end.

Have a nice week everybody and thanks for stopping by!

Barbara

Friday, June 17, 2011

Sunny Pincushion Tutorial

Pattern: Made in K-Town by Barbara

Please respect my rights as designer: do not sell, share, translate, or publish any parts of this pattern (including pictures) online or elsewhere without my permission. Do not claim this pattern as your own. Feel free to sell the finished items you’ve made from my pattern! If you do, a link-back to my blog www.made-in-k-town.blogspot.de would be great.
Thank you! 


Material:

I used 4 different colors of Catania by Schachenmayer and a 2.5mm hook. Make sure you’ll work with a similar yarn and a 2 – 2.5mm hook, otherwise you’ll end up having a monster cushion :) You can use up to 7 different colors if you want to. You’ll also need some fabric and stuffing material for the inner cushion and a little decorative button (optional).

Some General Notes:

For this pattern I use US crochet terms. We’ll need the following stitches: chain stitch (ch), slip stitch (sl st), single crochet (sc), half double crochet (hdc), double crochet (dc), and treble (tr).

I did not write down the chains at the beginning of each round: for the first stitch in every round, work chains (first tr = 4ch; first dc = 3ch; first hdc = 2ch) or, when working with a new color (rounds 2-5), start with a “standing stitch” i.e. join the new color with a slip knot or a simple loop on your hook and just work the first tr/dc/hdc/sc as usual.

Unless otherwise stated, join rounds with a sl st.

I’d be ready to start now, you too? Okay, let’s go:
 
Front Part:

1st Round: Start with a sliding loop (or “magic ring”) and work (2dc, 1ch) 8x inside the loop, fasten off (8 dc2-groups)

2nd Round (new color): work (4dc, 1ch) in every ch1-space, fasten off.

3rd Round (new color): work (1hdc, 1 long hdc, 1hdc, 3ch) in every ch1-space, fasten off. For the long hdc, work a hdc as usual but insert the hook not into the ch1-space, but into the second of the 2dc of the first round and draw up a long loop to the height of your current working round. Your circle might ruffle a bit now (mine does), but don’t worry – this won’t matter in the end.

4th Round (new color): work (6tr, 1ch) in every ch3-space, fasten off.

5th Round (new color): work 1sc in every tr, and 2sc in every ch1-space (64 sc), do not fasten off!

6th Round: work 1sc in every sc without further increasing (64 sc), fasten off, then weave in all the loose ends and sew your button into the middle.

Back Side:

Unfortunately, I’ve got no stitch-by-stitch pattern for the back, because here I work intuitively. The goal is to crochet with sc a circle (flat or slightly cupped) that has exactly the size of the front part and 64 sc in the last round.
I’ll try to guide you through this with some ideas:
Start with a sliding loop and work 6sc inside the loop. As a rough rule of thumb, you have to increase 6 sc per round in the beginning.

Later (After the fifth round is good, there you should have 30 sc) you should go down to 5 increases per round, and after a while to 4 or only 3 or 2 increases per round – you should frequently count the number of your stitches and compare the size of your circle with the size of your finished front part.

To avoid a hexagon shape, make sure you vary the spot where you increase. You can join the rounds with a sl st, I prefer working a spiral because I don’t like the visible “seam” of the slip stitches. I finish the spiral with a sl st into the next sc.

The Padding:

Take a piece of fabric and cut out two circles the size of your crocheted circles (plus some extra millimeters for the seam).

Sew the fabric circles together (leaving a little gap), turn it inside out, fill it with batting very tight (!) and close the gap


The Finish:

Now it’s time to bring it all together: Join a new color right above the little space between any 6tr-group and crochet your circles (right sides facing out!) together with sc. Half way around, slip in the padding, and go on with sc until the cushion is closed.

For the next round  (the petals), make 1ch, then 1sc into the same stitch, skip 2 or 3 stitches and – without starting chains – work 10 tr (petal) in the stitch right above the middle of the 6tr-group. Skip 2 or 3 stitches and work 1sc above the little gap. Again, skip some stitches and work your next petal (=10tr) above the middle of the next 6tr-group.


Of course there is no exact middle stitch to a group of six, so you have to try which stitch looks best for your petal. Sorry for being a little vague here. Continue this pattern (sc, skip a little, petal, skip a little…) until the end. Fasten off, weave in the ends, et voilà…


Congratulations, you’ve finished your first Sunny Pincushion!


I hope you’ve enjoyed my first tutorial, if you’ve got questions or find any mistakes, please let me know! Of course I’d like to see the pincushions you make, so feel free to write a comment and post the link to your pictures!

Thanks for your visit in K-town,
Barbara

Wednesday, June 15, 2011

Previews and Reviews

Some of you have asked me for the pattern of my pincushions and so I’ve decided to make my first tutorial ever. Last week-end I’ve made this pincushion and took step-by-step-pictures:

 
I still need to write down some instructions, but I hope I can post the Sunny Pincushion Tutorial this week-end. (I love it, when people name their projects!) :)

The last few days, I’ve been quite busy with the Tutorial and the Baby Blanket (oh, and sometimes my job intervenes as well), so there’s nothing new I can show you. But – I’ve still got pictures of stuff I made before I started blogging.
Here are pictures of two cans I’ve covered. The first one is from IKEA and when I bought it, I thought it would look nice with a belt of granny squares around. It does, don’t you think?


The next one is an empty body lotion can that I found somewhere in the depth of our bathroom cabinet. Again, it’s embellished with buttons and beads – I just can’t let go :)


But now I have to let go of this post – the job’s intervening again…

Hope to see you soon here in k-town,

Barbara

Sunday, June 12, 2011

Mission Baby Blanket: 17 Squares to go!

When I came home from work on Thursday, it almost felt like Christmas in June: there were three parcels waiting for me on the stairs! One of them contained my yarn I needed for the baby blanket, and it came as no surprise, because the day before I had received an e-mail that it had been shipped. Thankfully it was the right shade of green this time, so I could finally go on with my baby blanket. Here you can see the progress so far:


The final array will look different of course, but I don’t want to give away too much today. The finished blanket will be made of 64 squares and I’ve completed 47 so far, so I only need another 17 – yippee! 


Now back to the parcels on my stairs: the second one was a little surprise for me, because it contained the double-ended long hooks I ordered from an UK-Seller on Ebay. I paid on Tuesday and received the hooks on Thursday, now that’s something, isn’t it? I had my first go at Crochenit on Friday night, and I was thrilled! Thrilled because I learned a new crochet technique, thrilled because it was so easy, and thrilled because I see so many new possibilities with that technique! Now all I need is an idea for a project where I can use Crochenit and then I’ll share my experience here.

The third parcel almost swept me off my feet: It was my order from China and I had actually given this one up, because it had been at the German customs office since May 3rd, and nobody could tell me why they kept it so long or if I’d ever receive it at all. The Chinese seller (from Ebay) had already prepared another shipment, because he didn’t count on the first one either. Here’s what I’ve ordered:


I already told you that I love buttons, and these are heart-shaped wooden buttons with painted flowers on it. I’ll use it as embellishments for my stones and pincushions and hopefully many other things.
Here you can see a whole bunch of beads that will be perfect for my bookmarks (or just to put on my leather necklace):


I’ve also ordered more buttons and beads, but the pictures didn’t turn out well, so you’ll have to wait until they show up in one of my next projects :)


Thanks for stopping by, have a wonderful sunny Sunday everyone!

Wednesday, June 8, 2011

The colorful world of pincushions

When I started searching the web for crochet inspiration a few months ago, I quickly became a huge fan of Rachel from Clever Cheshire Cats. Have you checked out her blog yet? Everything she crochets is simply beautiful! My favorites are her little pin cushions and I wanted to make one of them when I first saw them. So, inspired by Rachel and with my own ideas for a round pattern and some decorative embellishment (damn, I love buttons), this is what I've made:


For the stuffing I sew a little cushion and fill it with batting. This is the part I don’t like, because I’m not good at sewing, but this way I know the stuffing won’t pop out through the holes. I work the two sides of the pincushion separately, then I crochet them together (half way through I slip the little sewn cushion in) and in the end I add the petals.


If you take a closer look at the pictures, you’ll see that the pattern vary a little, but I think by now I’ve settled on the pattern I like best.


I also played around with different sizes and shapes, like squares or even a hexagon, but the big round ones are definitely my favorites.


They are so quick and easy to make, and I love working with the colorful Catania yarn. By the way: today I've received an e-mail that my yarn is finally shipped! While waiting for the yarn I’ve already weaved in the ends from the finished squares, so with a clear conscience I can start the next stage of “Mission Baby Blanket”, soon. Hooray!

Looking forward to your next visit here in K-town,

Barbara

Related Posts Plugin for WordPress, Blogger...